
Available lighting vs. photographic lighting
![]()
Using each in an AV systems shoot
![]()
by Don Kreski
When people ask me how to go about shooting their own AV systems photos, I encourage them to learn to work with available light. Yet there certainly are times when it’s best to bring in your own lighting.
My preference is to use the lighting in the room whenever possible and as much as possible. In a well-designed room, the architect or interior designer has put a great deal of effort into the installed lighting, and it’s a crucial component of the look of the finished room. I have hired photographers who insist on replacing or overpowering that lighting with their own and the result, in my mind, is artificial at best.
Windows a problem
Which rooms are good candidates for an available light approach? It’s really a question of contrast. The more contrast there is between bright and dim areas, the more difficulty you’ll have with available-light photos. Windows can be a big problem. If there’s a window in the shot, the day is bright and you don’t light the room, anything outside will be washed out or go completely white, and the edges of the window itself and objects immediately inside will be washed out as well.
You can minimize or avoid the problem by closing blinds or draperies, shooting the side of the room opposite the window, or shooting at dusk or in the evening. It’s also possible to shoot a darker exposure of the window itself and strip that image into the main image in PhotoShop. That’s a strategy I’ve used many times, but it gets to be a lot of work because of all the objects in the room that get blown out by the bright sunlight.
When you get into residential shoots, however, it becomes very difficult to work around windows. You need to raise the level of the lighting to match that of the outdoors–ideally without overwhelming the feel of the lighting in the room. I like to use one or more strobes with umbrellas to softly wash extra light over the room. You can do this very evenly or you can choose to direct extra light at certain areas that you’d like to emphasize.
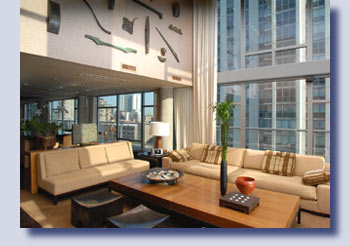
To light a room evenly, start by placing a strobe with an umbrella behind the camera position. Place the strobe as high as you can or, if there’s a white ceiling, try bouncing it off the ceiling. You’re trying to raise the lighting level of the room without adding shadows or overpowering the light already in the room. If one strobe doesn’t give you enough light or results in a bright area in the center of your shot, try using two or three, spaced evenly across the room behind the camera. By the way, for larger rooms, you may not get enough light from an on-camera type of strobe on a stand with umbrella. I’d suggest a studio strobe with at least 250 watt-seconds output. (I used two 750 w/s units, with umbrellas and bounced off the ceiling, for the shot on this page.)
Color issues
When you start to mix daylight and artificial lighting, be cognizant of the color differences between different types of lighting.
The color of daylight varies, from about 5000° K on overcast days to about 6500° K in bright sunlight. Incandescent light, on the other hand, is quite yellow - about 2400 - 2800° K. Florescents vary with the type of tube –and they do not precisely fit the standard color-temperature scale. Florescent lamps run from about 3000° for warm whites to 5500 K for the new full-spectrum bulbs, but there’s often a green tint that is not taken into account by these numbers, since the color temperature scale considers yellow to blue tones only. Halogens, too, are problematic, generally turning red in a photo.
![]()
![]()
![]()
![]() The camera, of course, is much more sensitive to these color differences than our eyes, and what we might never notice while standing in a home will become very obvious when looking at a photo.
The camera, of course, is much more sensitive to these color differences than our eyes, and what we might never notice while standing in a home will become very obvious when looking at a photo.
Twenty years ago most professionals tried to balance every light in a given room, but today the style has changed. If you look carefully at photos in architectural or home magazines, you’ll notice the telltale greens, yellows and blues of mixed lighting. It’s really up to you to decide what you like.
Generally speaking, however, if you have a lot of daylight coming into a room, you’ll want to use strobes (balanced to daylight), not the more yellow studio lights you might use for video. If the color of the room’s florescents or incandescents bothers you, you’ll either need to switch them off, filter them, or change the bulbs to the new daylight-balanced type.
If daylight is not an issue, it’s possible to filter your strobes to match the incandescent or florescent lighting in the room. (Check out Rosco Cinegel material available at good camera stores, which you can cut and clip over your lights.) If you’re shooting with available light, the same issue exists...either you accept the color anomalies from mixed lighting or filter or change out the bulbs so that everything comes together in one white balance.
Those who have one of the better digital cameras will find that shooting in RAW mode can overcome a lot of problems. Everything I’ve said about mixed lighting is still true if you’re shooting in RAW, but it allows you to correct any mistake you make when you set your camera’s white balance.
A little at a time
If all this sounds complicated –it is. You don’t need to know everything at once, however, to take good photos. A lot of AV contractors who do their own photography shoot only the easier rooms or the more routine jobs, bringing in a professional when they need to. It’s also possible to do the photography yourself but have your images retouched by someone with PhotoShop expertise.
The key thing is whether you enjoy photography and will enjoy learning more about composition, lighting and color. If so, you can start simple and build. If not, you’re probably better off focusing on what you do best and bringing in someone else with these skills.